Wednesday 3 December 2014

Week 9 Extention and two days of Critical Studies

Week 9 took an interesting turn, with an announcement of an extension for the village project. Meaning that I was given a great opportunity to improve and push my house model further. 
The good news was followed by an interesting lecture on the colour theory. As an artist I felt that the theory is very important, because a great model or painting would be overlooked if it had a poor colour palette applied to it. After the session everyone received feedback on how to improve on the house models.
 photo b989dc08-128b-4156-984d-94d050b69e24_zps9e27c06a.png
The house wasn't chunky enough as the wooden beams were too thin. The silhouette also did not quite fit the requirements. So I've increased the size of the breams and shaped up the whole house it would fit the style guide more.
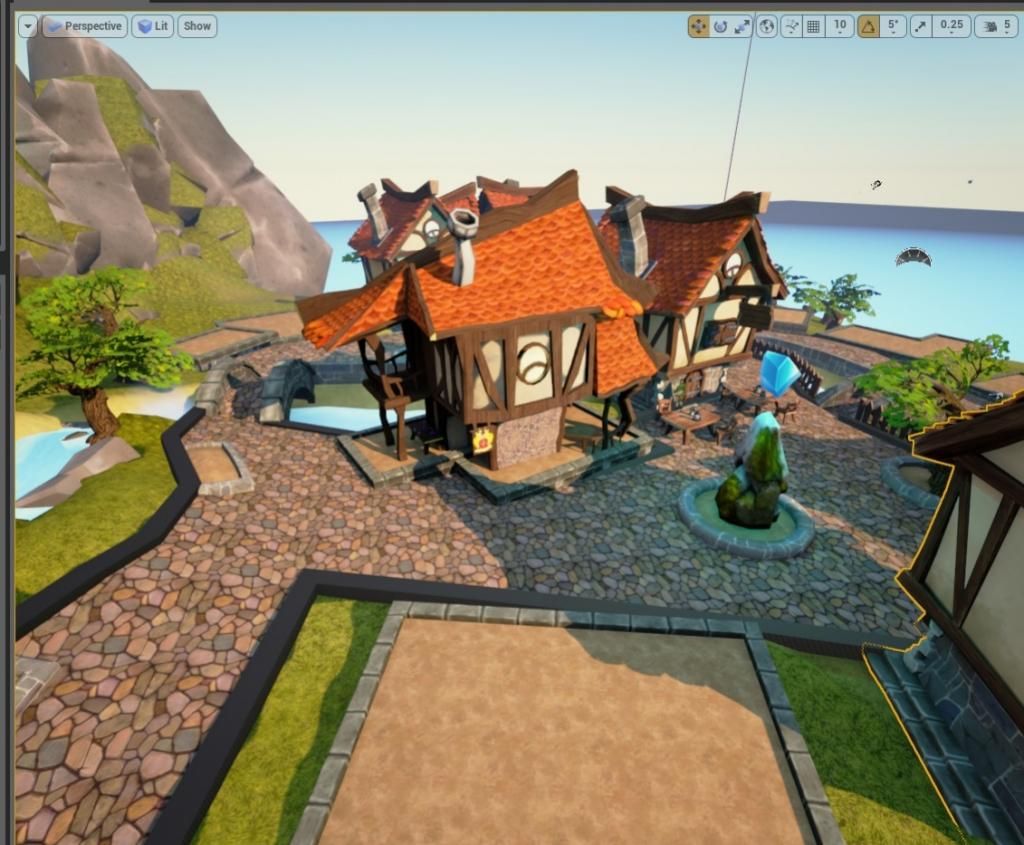
Now the house is in a chunkier form and with an altered ground floor, which I made smaller. The roof has been changed slightly as well. All that's left now is to brighten up the texture colours and export the model into the Unreal Engine. photo cf31bead-0e96-4d3c-8770-be5cad8849a1_zps31fb4f99.jpg photo dfef4257-210d-4d81-ab36-319e054674d6_zps33784810.jpg

 photo DSCN4840_zps26f35416.jpg 
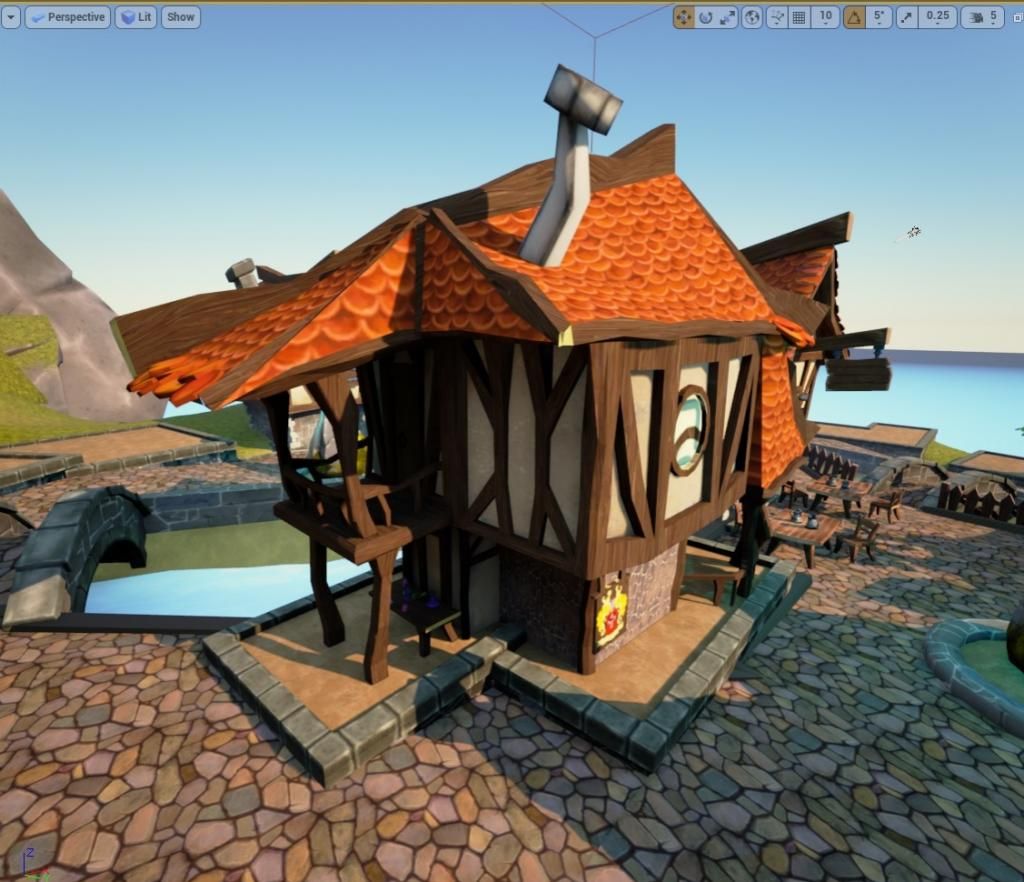
The life drawing took a turn and pushed me out of my comfort zone, by completely changing the media of drawing the model. This time I could only use scissors and dark paper to cut out the silhouette of the model. It was quite unusual, but very exciting and I did feel like I did quite well.
The first silhouette was a simple pose, so less edges were needed to cut. The rest of the cut outs were a seated pose. The very last silhouette was put into an environment that I drew with a pencil. This also meant that I had to consider the models proportions when cutting out so it would look right in the environment.


Even thought it was extension week, I had two days of critical studies. A conference day was held to help improve on blog writing. There were many different sessions to choose from and I attended the one suggested in my blog feed back. 
I went to Word art first. The seminar explained how to analyse work and be descriptive when writing about my own and other peoples art. What I never thought of before was that I should make mind maps before starting my blogs. In the session me and my group had to write down words describing the chosen character image. The words ranged from media, style, feelings, mood and etc... At the end of the session we had created quite a wordy mind map and example paragraphs on our page.
The other sessions were more formal, describing differences between descriptive and analytical writing. This helped me consider point in which I need to improve.
 The last session explained how to manage my time and how to make a working schedule. It also made everyone consider that work is as important as personal time and also sleep.
It was quite an interesting week and I do hope to improve more on my blog writing in the following weeks.

Tuesday 2 December 2014

Week 8 Bradgate Park and the continuation of the Village project

 photo DSCN4832_zpsd1f09414.jpg

This week has been one of those rare ones, where the tutors took the whole group out to draw and gather photographic reference. The place where we went was called Bradgate Park. A very beautiful and huge park with several old ruins, but the ruins were not what we came for. It was the nature and trees, a primary source of research for the upcoming Tree Project. It was the most perfect day to visit the park as the weather changed throughout the day. The colours went from grayish tones to very saturated colours infused with sunlight. The environment had looked just like a post card from Scotland and there was also an array of wild animals and fearless deer.
I chose one of the paint overs as my final concept reference and did a quick concept painting of the house sides. This allowed me to move onto modelling the house, as I was running short on time. My group and I have decided to keep the same colour scheme for our buildings same as the buildings in the example village created by the tutors.

Bradgate park had a very big variety of trees. Most of them were foreign, a lot of the seeds came from overseas. I think this tree had quite an interesting silhouette, the curvy branches seemed like they were weighted down by the miniature leafs. This image also has very saturated colours at the back. It was taken at the end of the journey in Bradgate.
It was nice to break away from the house project and do something a little different other than the usual weekly routine.

The house project continued and I have finished the concept for my house and had moved onto modelling.

 photo concepts_zpsc9f4417c.jpg
I chose one of the paint overs as my final concept reference and did a quick concept painting of the house sides. This allowed me to move onto modelling the house, as I was running short on time. My group and I have decided to keep the same colour scheme for our buildings same as the buildings in the example village created by the tutors


 photo Side2_zpsb4ad0e7a.jpg   photo almostfinished_zpsef97f0f0.jpg
At the end of the week I had my model close to conclusion. I did learn  a new way of texturing. I had to make my Photoshop textures tillable, so even if I needed to stretch any of the unwraps out of the boundaries of the UV map it would still have the same quality. This method saved a lot of time and I did enjoy making stylised textures for this particular house. 
I will learn to import the house on week 8 and show the results of how the house looks in the game engine.
There were no critical studies this week and instead we were allowed to work onto finishing this project.  

Sunday 23 November 2014

Week 7 Start of the village project

This week was quite unique as I was introduced to a new project called The  Medieval Village Project.
The project includes three parts in which I will need to model a house, tree and a character following a given style. My end results will be imported to an existing village created by my tutors. 
It is also a group project which means that groups of 10 people would need to communicate and interact to create successful end results.
But before the project in my Visual design class I was exploring positive and negative space. I had to draw what surrounded the model instead of the model itself.

 photo DSCN4836_zps68e76464.jpg

In digital painting the tutor came up with a creative way to start the medieval project, by using parts of old houses and bashing them together. I felt quite like playing with lego parts and the photo bash allowed me to prepare myself for the silhouette making and to understand what materials and shapes I should use.

 photo Justhouses_zps24ce6bcd.jpg
I moved onto making silhouettes and gathered opinions of my classmates to know which silhouettes seemed most interesting to them.

 photo HouseSilhouettes_zps1085f436.jpg
After choosing the silhouettes that seemed right, I did paintovers to have an idea and come to a decision of which house would end up as a final concept.

 photo Paintovers_zps4a7d74c3.jpg
This was the result and these paintovers concluded my week. A very busy week awaits next and a week that will probably throw the biggest challenge in my life and test my patience.

Monday 10 November 2014

Game Art Design Week 5 and 6! First serious project practice

This post will be a little different as I chose to mash two weeks into one as weeks 5 and 6 were dedicated to the Stylised Rock project. Week 6 was also a review week and for that reason I was able to focus on finishing given tasks and a game production project.

Let me begin with the start of week 5! It started with the very first trip on the course to the old Guild Hall museum. The purpose of the visit was to gather as much visual reference as possible and the information gathered would later relate to the Village project in week 7.
Here are a few examples of the Guild Hall thumbnails.
 photo DSCN4706_zpsae751077.jpg
 photo DSCN4704_zpse2983c3c.jpg
 photo DSCN4705_zps9ee61914.jpg


The next day I was given my first Game production project in which I had to create a stylised rock from scratch, using my own concepts before developing the final 3D piece.
The creation process began with me gathering an extensive array of rock images and with the images I had to create a mood board. With the help of the mood board I started producing sketches of real life reference rocks and drawings of rocks and crystals from pictures.
I was interested by the peridot shapes, which is why I started my silhouette making with the shape of the green stone.
 photo DSCN4707_zps0028c05b.jpg
 photo Untitled-1_zps1eed23d0.jpg
I moved onto rendering in values onto silhouettes and with that I have made my decision on the final design.
But the process didn't end there. I created a few more colour paint overs on how I could make the stone look like with patterns.
 photo RendersofSilhouettes_zps7d51daf1.jpg
 photo stones_zps0301503d.jpg

I researched some frog skins and patterns and used them in the development of my idea. The stone shape did remind me of a sitting frog with it's mouth open.
 photo rocks_zps83de86c3.jpg
This was the result at the end of making the concept of the stylised rock.
 photo Rockconcept_zps2b208ed0.jpg
Using the two concepts as reference planes in 3ds Max I was able to create my stone easier.
 photo RockScreen3_zps21a7fecf.jpg
 photo RockScreen2_zps5de51517.jpg


The conclusion of the stone also concluded week 6. I do understand that the 3D model did not turn out that well, but I do realise my mistakes and will prove on them in the following week in the new project.

Wednesday 29 October 2014

Week 4 Start of new projects

As week 3 concluded the bootcamp, I started week 4 fresh and new with learning about values of 5 and 10 tones. My visual design task for the week was to investigate lighting and values using different pencils or just one when drawing and rendering thumbnails.
 photo DSCN4681_zps0cb5d3ba.jpg
 photo DSCN4678_zps3b209cd8.jpg  photo DSCN4679_zpsa7374dd3.jpg
It was quite interesting and enjoyable to make small thumbnails with different shades of grey, but I really need to push myself and widen my range of values. I tend to limit myself just to a few.
 photo DSCN4682_zps46c49ae3.jpg 
 I also drew figures of my classmates for life drawing class.
Capturing the figures was quite easy, but I would end up with small feet, another thing I have to take note of and improve.
 photo DSCN4683_zpsbdb5e036.jpg

In game production I got my very first brief for a project. It was called the Sci-Fi Crate and I had to create a crate that looked as close to the given concept as possible.
The development started with making a mood board in which I have placed a series of pictures showing the object, style, mood and colour before actually making the crate.
Then in the 3ds Max after setting up the reference planes, my job was to follow the lines and make my object.
The crate project required me to use tools and tricks I've learned previously from week 1 to now in order to create my object. As the 3D model was done I had to unwrap it efficiently and texture it using photos and images to create a photo realistic effect. And so finally at the end I had my crate finished.
 photo CrateTextureGabrieleBondarea512x512p_zps8966734d.jpg  photo ScreenshotofCrate1GabrieleBondareva_zps250f5ff1.jpg 

 photo WireframeCrateView1GabrieleBondareva_zpsf8482867.jpg 
It was a difficult challenge and a good learning experience which will help me improve when working on other upcoming projects.

Wednesday 22 October 2014

The end to Game Art Bootcamp, week 3

On week three in the visual studies I was introduced to two point perspective and the important role of colour, mood and lighting. My mission was to explore lighting in photography and two vanishing points in drawing. The easiest and most obvious choice was to sketch streets and buildings. I found it quite entertaining and some there were hints of three point perspective.

 photo DSCN4586_zps931db8e8.jpg
 photo DSCN4584_zps6c97bff3.jpg  photo DSCN4585_zps871d3cd7.jpg
In life drawing I continued practising sitting positions.
Once again I started out with a warm up, which I truly am starting to enjoy very much. For the reason that there is so much freedom in the line and marks I make. The image at the end I can produce is perhaps more interesting sometimes with exaggerated proportions.
 photo DSCN4587_zpsf95af9f9.jpg  photo DSCN4588_zps3b3988ab.jpg
The side I chose to draw from was quite difficult. For that reason my longer 10 minute sketch did not turn out as successful as I thought it would.


 photo DSCN4589_zps73a874bb.jpg  photo DSCN4590_zpsfe5b7431.jpg
My visual design day ended with digitally painting a template for a cubee-man project. The end goal was to create a superhero or a super-villain on Photoshop and then build the character from paper the next day in my game production class.

It felt really entertaining to see how my digital painting turned into an object I could touch. My first character was a space man. I wasn't quite satisfied with the first cubee, so I made another one on my free time.

 photo DSCN4591_zps4a9efbbc.jpg
The Coat dog and Space Man cubees. The character on the left was my second one I made. I worked more on the detail and I am quite satisfied with the outcome as I think it is much more interesting than the first cubee man model I made.
 photo bettycubee_zps8bd46e03.png
The template for the cubee man that I had to use to paint in.

This week I had a go at my first presentation where I discussed design aspects of my favourite character. I had to thoroughly explain in detail the colour palette, mood, pose, hues, traits, and etc... But the challenge was to in a short time such as three minutes describe my character in detail, using smart sentences as this was a formal presentation for a couple tutors and a small audience. This in return had to teach me to only talk about important things. And I do think that I will improve on it, in the next presentation.

For the rest of my week I continues practising texturing. I was unsuccessful with my hammer last week, so I took on the table and chairs instead. Unwrapping and texturing went smooth and here is the result.

 photo tableandchairstextured_zps93afa2f9.jpg
 photo Spheres_zps4f0d5605.jpg
The sand and dog sphere. The sand texture was quite difficult and I am planning to attempt to make a better looking sphere in the future.
I also made two spheres. One with a sand texture and another with a dog in it.

This concluded my learning journey and the bootcamp on learning basics for the course. I look forward to the upcoming projects and challenges that are about to come.

Sunday 12 October 2014

Game Art Design Week 2

After an exciting first week I continued my game art journey onto the first day of week two.
I was tasked with another set of thumbnails, but this time it was of the archway. The arch was very beautiful, but a bit difficult to draw as the surfaces of the walls were a bit shattered. In visual studies I also explored the principles of two point and three point perspective and tried to experiment by drawing the arch from different points.
 photo archway2_zpsd8764645.jpg  photo archway_zps84ba5411.jpg  photo archway3_zpsee0613d4.jpg
In the life drawing class I progressed onto more difficult body poses, starting with continuous line drawing and also tried drawing with my left hand. It wasn't too difficult to draw with my left hand as I am partly ambidextrous.
 photo lifedrawing2_zps780ae9e1.jpg
After the quick warm up and a few more simple poses, I practiced sitting positions.
 photo lifedrawing_zps6af36ba0.jpg
I had to face the model from the front. I found it difficult to get the legs accurately, as my drawing reflects that there is a problem in the leg area.
 photo lifedrawing3_zps637fabfe.jpg
Because I had difficulty drawing sitting positions up front, I focused my homework sketches to be more frontal.
 photo DSCN4516_zps49c3b50a.jpg
This week I also got a stretch goal to do textured spheres or cubes. I chose to start making spheres with textures.  Because it is a stretch goal I've set myself a goal to do at least one a week. photo Bubble_zpsabb5e59d.jpg


For the rest of the week I practiced on the 3ds Max and attempted texturing. I've spent quite a long time trying to texture my hammer model, but it did not come out right.  photo hammer_zpsdd22551f.jpg  photo mylifehoursdownthetoilet_zps4cd01733.jpg
I understood what to do, how to neatly place the object lines on the right place of the texture. Except by mistake I've had done something wrong on two different channels. It was a trial and error process but I enjoyed it. I will attempt to texture objects I  will make on week three.
At the end of the week I explored what makes a good character design. My first presentation will be done on week three. I will have to in a short period of time break down my favorite character to explain why is a good strong design.